sesame street birthday party hats

A Sesame Street Birthday Party

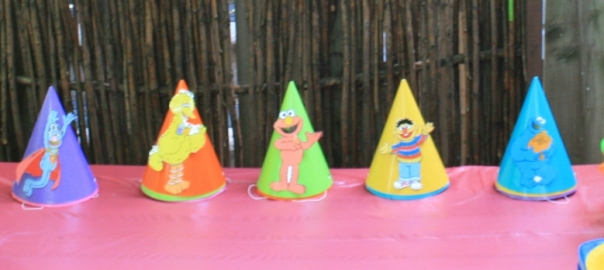
Fynn was obsessed with Sesame Street street during his early toddlerhood so naturally, we choose a Sesame Street theme for his second birthday party. Like most two year olds, he loved Elmo and Cookie Monster and pointed out the characters every time we happened to see them in shops.

sesame street birthday party

We tied a large bouquet of helium balloons to the post of our front porch and posted this large sign to our front door:

sesame street birthday party sign

We set up several small play areas and games in our back garden since most of Fynn’s birthday guests were two and under. The first game was Pin the Nose on Elmo, which everyone took a turn at. I drew Elmo’s face on white poster board cut out some yellow circles for his nose. The noses had velcro on the back to match up with the other side where his nose should be – so if they didn’t guess right, the nose wouldn’t stick. Mostly the kids just liked to stick and unstick his nose and didn’t have time for blindfolds and spinning in circles!

elmo nose game sesame street birthday

We found this sesame street-themed trash can at the Dollar Store one day when picking up supplies so it fit perfectly for our Oscar the Grouch, Trash Can Toss game. I hand-stitched a few brightly-colored beanbags from felt and beans and encouraged the party guests to try their skills, moving farther back from the trashcan each throw. If you have toddlers you know that putting things into other things is a sure-fire party winner.

oscar the grouch bean bag toss

I used the Wilton Elmo Cake pan to bake a delicious and kid-friendly chocolate chip zucchini cake. I have never been disappointed with how the Wilton character pans turn out and Elmo was no exception. It’s difficult to tell in the photo but his face is really textured! I chose three different tips from my small Wilton decorating tip set to pipe the eyes, nose & hair and I used brown sprinkles in the mouth.

elmo cakecutting the elmo cake

We bought a Runners balance bike for Fynn. It is so well made and adjustable to grow with your child. It’s a great way for them to learn how to balance on a bike (which is the hard part) and he’s transitioned easily to a big boy bike now. My youngest, Cade, has started riding it now and he also loves it. It is a really quality bike that will stand the test of time!

runners wooden bike

All of our party guests went home with cookie monster bags that looked like these made by Michelle Hornback over at Stampin’ Up!

cookie monster treat bag

Somehow, I don’t have a photo of the ones that I made! That’s what happens when you aren’t intending to blog about something…it didn’t matter as much to me to have great photos of all the little details. And I’m kicking myself now that I have an opportunity to blog about them!

What did you do for your child’s first and second birthday parties?

Kendra signature

Check out my new web site at fynnbaby.com!

p.s. My posts sometimes contain affiliate links – but I only ever post about products that I love!!

sesame street kids birthday party

distressed stool

Our Farmhouse Stool

With two little boys in the house, we have stools in almost every room. We want to encourage the boys to help themselves or help us with washing hands, brushing teeth, preparing food, baking, etc. and being at countertop level is important for them.

Ikea step stool

One of these stools from Ikea has been on my to-do list for an upgrade since I bought it. We specifically got the unfinished beech so that it could be transformed into something more original-looking.

There are several posts on Pinterest about making a new piece of furniture look old and that’s exactly what I envisioned for this one.

paint from target 
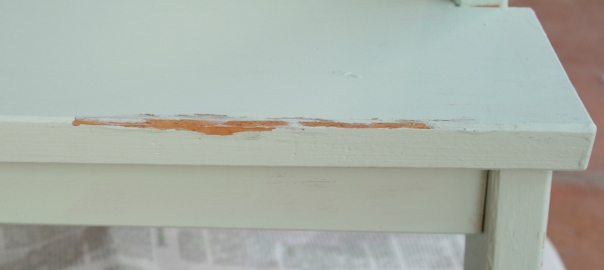
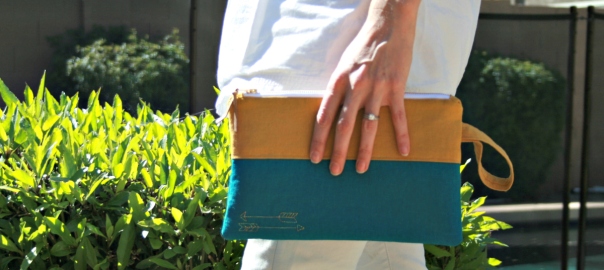
I spotted this Devine paint on a recent trip to Target and bought the sample size which was more than enough for our little project. I think the color is called “Horizon”.

Armed with this tutorial on using Vaseline to distress furniture as you paint, we took to our stool with a hammer to bang it up a little bit and then dug out our giant tub of Vaseline. Fynn got a little excited with the Vaseline – as is to be expected from a three year old! – which we slathered on in a few places around the edges and top.

painted stool

Some of the patches are a little bigger than others, and even though the tutorial says to use a lot of Vaseline, I think a little would be just as effective. The paint glides right off any of the places that have even a little bit of Vaseline on it, even when the paint has dried. In fact, I attempted to age the bare pieces with some balsamic vinegar after the paint was completely dry, but even the vinegar wouldn’t adhere to the Vaseline treated areas. Once the paint is well cured and I can give it a good wipe down, I’ll try that again.

I didn’t get any “during” photos because we were having such a fun time but I did get an “after” of Fynn, who was hamming it up about how much work he did!

painting boy

In hindsight, we should have put some painting clothes on, but thankfully he only got a little bit of paint on his shirt. I love the final result of the stool, especially since Fynn and I worked on it together!

Fynn+Cade Quilt

The boys are already getting a lot of use out of the stool and I love how it looks in our kitchen. I’ve been using it as a photo prop for my quilts and yesterday Fynn and I baked some gluten-free Banana Cake so it’s getting its fair share of use.

Do you have any furniture you’ve redone? I’d love to tackle a larger piece but am enjoying the practice on small projects like this. Please share your finished projects and any other tutorials you love.

Cheers!
Kendra

Sign up to our email list for monthly product updates and news!

Note: Some of posts contain affiliate links ~ but we will only ever post about products we love!!

felt quiet book cover

Fynn’s Quiet Book – Part 2

As promised, here are the two-page spreads I did for Fynn’s felt quiet book.

This first spread is one that I remember having in my quiet book as a child. The mother hen and her chicks – we loved hatching the chicks and putting them under the hen’s protective wing. Fynn does as well, cheep-cheeping as he goes. (Although, I embroidered “peep peep” on the page…what sound do chicks actually make??)

quiet book hen and chicks

I think this may actually have been my favorite page to make. The eggs and chicks are the cutest.

quiet book chicks

This two page spread is another one that I remember from a child. (I really must ask my mom what happened to our book?!?).

IMG_6584

The busy bees are on elastic bands so that they can collect the nectar from the flowers and then buzz back into their hive to make honey.

IMG_6586

Now that I live in the US, I notice things like spelling differences all the time. Can you tell I am Canadian and was living in Canada when I made this book? (It’s so difficult for me to say “zee” rather than “zed” to the boys!). Fynn is really into buttons now and practices as much as he can. When given the chance he always will choose a golf shirt with buttons over a plain tshirt.

quiet book flowers

This last spread really isn’t a cohesive two-pager like the last two although I tried to emphasize counting with both. The one on the left is four little dogs who are hungry. I used magnets in both the bones and the dog’s mouths so that they will stick together when they come in contact.

IMG_6588

My boys have both been to South Africa, where my husband is from, so I loved these beads by Darice in a variety of African animals. The beads slide across the ribbon so that you can count them off like an abacus. This is definitely another one of Fynn’s favourites.

quiet book counting page

Have you ever thought of making a quiet book for your children? I’d suggest starting with a felt pack like this Life Glow one. It has 40 sheets of felt in a variety of primary colors which are great for young kids.

Cheers!
Kendra

Sign up to our email list for monthly product updates and news!

Note: Some of our posts contain affiliate links ~ but we will only ever post about products we love!!

felt quiet book cover

Fynn’s Quiet Book – Part 1

I made this book two years ago when we were preparing for our first long distance flight with a toddler. He was interested in a couple of fun kids apps on my iPad, but my hope was that he could use his quiet book for that especially critical time before and during takeoff when you (used to) have to power down all electronics. I’m pleased to report that it worked like a charm, and has been used during all of the travel we’ve done in the last couple of years.

I didn’t have a sewing machine in our tiny house at the time so everything was hand sewn, so I’ve recently remade a new, and much improved, cover with handles.

quiet book cover

I did some freehand machine embroidery on the front but I should have backed the stitching with a contrasting fabric so that it would stand out more. Lesson learned.

The first page in Fynn’s book is his name. In all of my quiet book research prior to making this, I didn’t really see a name page that I loved so I came up with this idea on my own. The letters are attached with snaps and underneath is a copy of the letters so he knew where each one should go.

quiet book name page

The next page is a double-page spread but I’ll share the two that I did in Part 2 so that this post isn’t five miles long.

This page was fun to make and really isn’t a “teaching” page in the way that some other quiet book pages are. Fynn likes to make up names for each flavor and then make new cone combinations each time.

quiet book build ice cream conequiet book build ice cream cone

This is one of Fynn’s favorite pages. He learned his shapes early and I think he really loved that they all go together to make a picture. When he was around 2 years old, he loved to find shapes everywhere. Especially triangles, he loves triangles.

quiet book shapes pagequiet book shapes picture

This page is probably the one that is included in every single quiet book I’ve ever seen. In fact, I know that my mom made one in the quiet book that we had as kids. So of course, I had to include it! The little animal finger puppets are a great tool for learning the farm animal sounds.

quiet book animal finger puppetsquiet book farm animals

I didn’t try to minimize the number of loose pieces used in the book because I figured that it would be easy enough to replace any that went missing. But amazingly the only thing that is not intact after two years of use by two little boys is one of cow’s horns!

In this new cover, I’ve included a zippered pocket but with the button closure fastened everything stays nice and tight and felt is really good at sticking to itself!

Have you made or purchased a quiet book? What did you love about the pages included in yours?

Thanks for reading!

Kendra, fynn+cade
Sign up to our email list for monthly product updates and news!

Note: Some of our posts contain affiliate links ~ but we will only ever post about products we love!!

Snow On A Log

I’m taking a bit of a detour with this post but it’s the one that’s been in my Drafts for the longest as an idea. I consider my blog to be more about crafting and sewing, but, I’m a mom and that drives most of what I do and think about and create. So, I’m blogging about food today.

Specifically, something that I created for Fynn who always wants fruit but won’t eat any meat, eggs or beans (although we tend to eat paleo so beans aren’t generally on our menu). I’m always looking for snacks that are nutrient-dense and include some protein and fat – and a bit of fun. That’s how snow-on-a-log was born.

banana toddler snack

I remember as a kid my mom used to make Ants-on-a-Log for us, which generally consisted of a celery stick with peanut butter or (gah!) Cheez-Whiz, with raisins on top. (Do people still eat Cheez-Whiz?) It was definitely my least favorite snack, but it lead me to experient with other “log” ideas.

It seems a bit silly to put a recipe together, but here goes:

Snow-On-a-LogBanana coconut snack

1 banana

1 Tbsp almond butter or sunbutter

1 Tbsp unsulphured coconut flakes

1 Tbsp raisins (the ants are optional!)

Peel your banana and spread the top with nut butter. Then add your other toppings and serve.

Fynn didn’t always turn up his nose at most proteins – we did everything right: baby-led weaning, introducing complex flavors and textures early on – but he just slowly started to reject it. We sit down for dinner together as family most days and encourage him to try anything that he wouldn’t normally like, but I know it will take time…any tips are appreciated!!

Cheers!
Kendra, fynn+cade
Sign up to our email list for monthly product updates and news!

Note: Some of our posts contain affiliate links ~ but we will only ever post about products we love!!

fynnandcade diaper clutch

Sewing for the shop!

Richly-colored diaper pouch

This clutch has been in my brain for months – and I actually made a version of it that I carried around with me for weeks so that I could decide what I loved about it and what I could improve on. Sometimes I feel like I’m reinventing the wheel when I obsess over a pattern or design, but I’m a bit of a perfectionist and can get caught up with the most minor of details. I’m overjoyed with the final product, however, and listed it in my shop today. Yay!

Gold zipper

My absolute favorite part of this pouch (other than the colors…and the gold zipper…) is the arrow embroidery. I know arrows have had a bit of a thing going for a while now but I just HAD to add some to this little clutch.

IMG_6409

About the colors – I found these two bolts of linen fabric sitting side by side and although they wouldn’t traditionally be put together, something spoke to me. Do you ever have moments when colors just sing your name?

Thanks for letting me gush!

Kendra, fynn+cade
Sign up to our email list for monthly product updates and news!

Note: Some of our posts contain affiliate links ~ but we will only ever post about products we love!!

Girly Things – a labor of love

My dear cousin is expecting a new baby in a couple of months and has recently found out that it’s a girl! Given that I have two boys and my sister has three boys…I got really excited to start a girly project. I purchased some beautiful fabric from my favorite online shop, Fabricworm and then went in search for a newborn dress pattern online.

IMG_6175
I chose the Little Geranium from Made-by-Rae and having finished, I can highly recommend Rae’s tutorials/patterns. The pattern itself was easy to print and layout with her instructions, and the tutorial was very well laid out and easy to follow.

IMG_6177
Since I wanted to embellish the little dress, I chose an animal from the print and added a pink rhino applique to the front.

IMG_6176
And I traced a couple of design elements from the fabric – a buzzing bee and an apple – and embroidered the little pockets before attaching them.

The biggest lesson I learned from this project is that there is not a lot of call for gathering in boys clothes or accessories, and it’s a skill I definitely need to practice. I attached and ripped and reattached the skirt at least twice and still wasn’t 100% satisfied with the evenness of the gathering. I hope my cousin doesn’t notice!

IMG_6179

Kendra, fynn+cade
Sign up to our email list for monthly product updates and news!

Note: Some of our posts contain affiliate links ~ but we will only ever post about products we love!!

2014 Gingerbread Man Ornament

A handmade tradition

For the last several years, my older sister has sent a handmade ornament for our Christmas tree. Last year she sent us this quirky trio:Homemade gnome clay ornaments

One to represent each of us (Cade is still in the belly of the pink one – how cute!) If you’re like me, you love a vintage, relaxed feel to your festive fir and I think handmade ornaments are the way to go.

I thought I would continue the tradition this year by hand making one of my own to send to my sister, and the rest of my family. I love crafting with felt, there’s something cathartic about hand sewing felt, it’s so easy to cut and so forgiving. So, in a calm moment with my felt the 2014 gingerbread man was born.

2014 Gingerbread Man Ornament

A key component to this design was freezer paper: I used it to replicate my hand-drawn gingerbread shape, ironed it onto my felt and then cut it out. And then I ironed it to the back of a piece of muslin so that I could run in through my printer for the numbers. I used my circular blade to cut them out and I sewed them onto a piece of ribbon to make a pennant.

Gingerbread man with heart patch. fynnandcade.com

It wouldn’t be complete without our logo on the back. I can’t wait to hear what my crafty sister thinks about my submission for this year!

What sorts of traditions do you practice with your families?

Happy Holidays from Kendra, fynn+cade
Sign up to our email list for monthly product updates and news!

Note: Some of our posts contain affiliate links ~ but we will only ever post about products we love!!

Grandparent’s Hold Our Hands For Just A Little While…

…but they hold our hearts forever.

In the case of Fynn and Cade, both sets of grandparent’s live in other countries (and one set on another continent!), so the hand-holding is in short supply. I’m always looking for projects that include handprints or footprints to record a bit of the boys growth and this one seemed perfect.

We used Grafix shrink film and stamps from Target to stamp the boys hands. I wrote their names and the date on the back with permanent marker and punched holes in the tops with a regular whole punch.

img_5951

After shrinking I treated them with a couple of layers of this Krylon Finishing spray. I prefer a matte finish for most of my projects and while the plastic is still a bit shiny, the handprints were set beautifully.

img_5964

I did let them dry for a few days before I started handling them to assemble the key chains. But I think they turned out so lovely and can’t wait for the grandparent’s to get them in the mail.

img_5966

The best time that I found when working with shrink film as to make your own “ruler” so that you have a scale for what size you’d like your finished piece to be. Trace out small rectangle in your preferred size – I did 10″ and then mark of each inch. I also punched a hole in the end so I could keep it pinned on a cork board for finding easily next time. Then when you want to create something new, you can visual how big you’ll need to make it before shrinking so that it will turn out the perfect size in the end!

img_5947

What are your favorite projects for sharing your kids with their grandparents?

Kendra Raine signature Fynn Baby Fynn Company
Sign up to our email list for monthly product updates and news!

Note: Some of our posts contain affiliate links ~ but we will only ever post about products we love!!